How to setup your own blog using Jekyll on Github
I am not new to blogging. My blog on Blogspot is still “active”, I have experimented with or used Wordpress, Drupal, Medium, HubSpot and used several other platforms powering blogs at my employers. They all either seem bloated and are bloated because some require a database, some are very opinionted, some slowly get you into plugins hell and some are hosted so you kind of loose control over your contents, and some are flat out not suited for engineering blog. A good engineering blog often requires code highlights and usually don’t need bells and wishtles you often on these platforms.
After exploring several alternatives and looking at blogs of sotware professionals I enjoy I settled on Jekyll powered blog on Github. Documentations from Github are great but I still needed to do interweb search to get end to end setup working with https and custom domain. In true Open Source Software spirit here are more details followed by a simple howto explaining the steps needed.
Pros of Jekyll and Github Pages :
- No database needed. No server needed.
- Easy to setup local development environment
- Use all your
GitandGithubknowledge - Jekyll has minimalistic theme which is great for text heavy writeups
- Don’t need to know fancy
CSSandJavascriptto have a clean and well organized blogs - Amazing community to experiment with different plugins and themes
- Get a SSL cert from Github to serve traffic under
https.
Cons of Jekyll and Github Pages :
- You need to know how to write code and use github.
- Adding features like comments and search need 3rd party dependency.
Here are the steps:
-
Install and configure
rubyandjekyllBest is to go straight to the source at https://jekyllrb.com/docs/installation/macos/
- ` jekyll new blog
which creates a directory calledblog` on your localhost. You can call this directly anything you want. jekyll buildjekyll serve
jekyll serve --traceif you want to see more details of any errors. This runs a local webserver athttp://localhost:4000where you can see a running blog with default theme.-
Customize default installation
- Update
_config.yamlwith your name and social media coordinates. Any changes in this file requires a restart of jekyll process so make sure toctrl+cand restart byjekyll servefrom theblogdirectory. -
Update about.markdown to tell the world about you.
-
Add a new blog
Jekyll requires blog post files to be named according to the following format under the directory
_posts:YEAR-MONTH-DAY-title.MARKUPWhere
YEARis a four-digit number,MONTHandDAYare both two-digit numbers, andMARKUPis the file extension representing the format used in the file.
- ` jekyll new blog
-
Github project setup
- Create a new repo on your Github
The repo name needs to follow
{github.user.name}.github.io. For me, it’sprabhatjha.github.io -
Setup this repo as remote origin on your
blogproject and push your code . Example:git remote add origin git@github.com:prabhatjha/prabhatjha.github.io.gitgit push -u origin master - Your new blog should be available at http://
{github.user.name}.github.io
- Create a new repo on your Github
The repo name needs to follow
-
Custom Domain
- I use
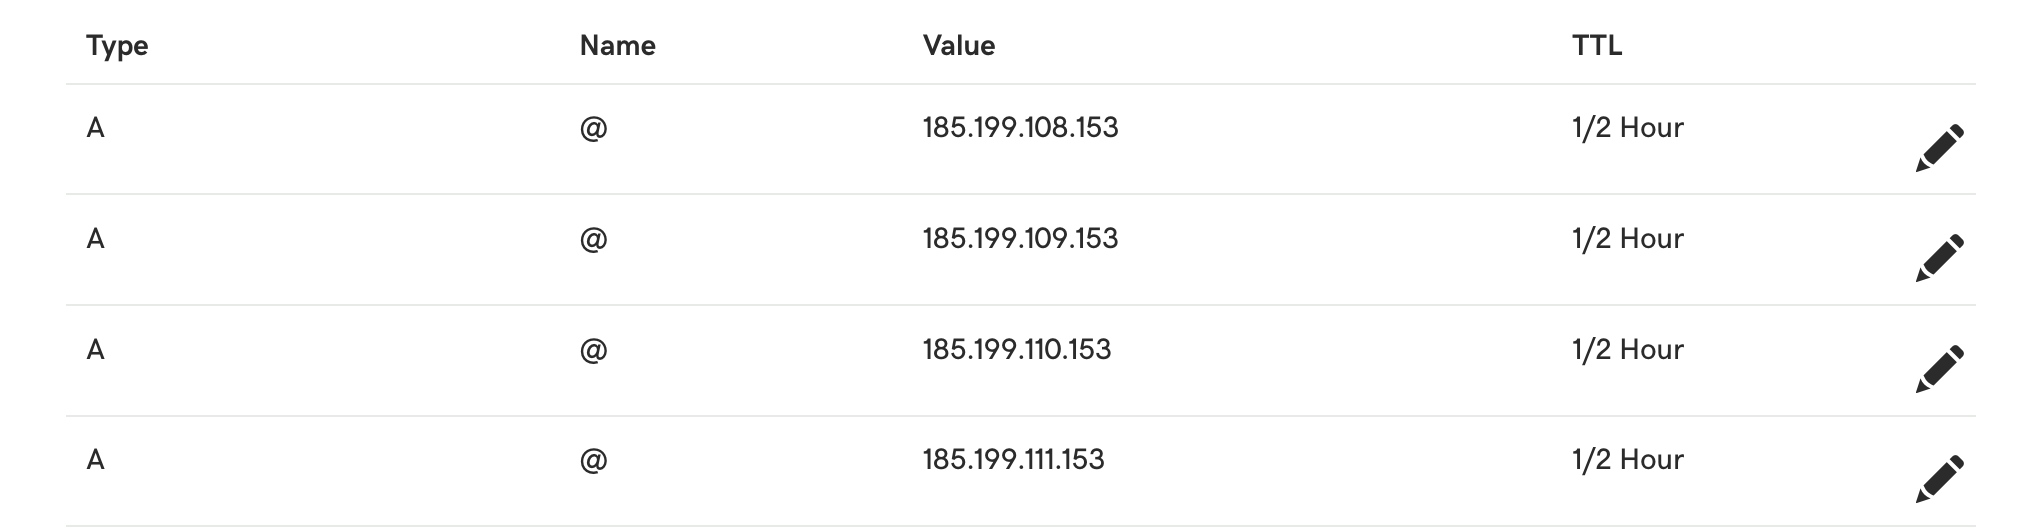
godaddy.comfor my domain name where I have boughtprabhatkjha.com. I could not getprabhatjha.com:-( - Under GoDaddy’s DNS Management interface add following
Arecords. The IP addresses point to Github’s IPs reserved for github pages.
-
Add a
CNAMEforwwwsubdomain pointing to your github page.cname www prabhatjha.github.io - Go to settings page for your new repo and github and follow the setup for custom domain connection. Github has pretty good documents with screenshots.. This process adds a new file
CNAMEin your repo. - Keep in mind that DNS resolutions take some time so you have to be patient. For me changes would take about 5-10 minutes before they were working.
- For SSL configuration it took Github about 4 hours before cert was generated. It’s important that your A records and CNAME are setup properly at your registrar otherwise Github won’t issue a certificate.
- I use
That’s it. With these steps I have https://prabhatkjha.com working. After all you are reading this blog. ;-)
As I add more features I will try to keep this blog updated.